
I have finally finished my applique wall hanging! I call it 'The Love Birds'. Just in time for Valentine's Day.

One holds the key to the other's heart.

It's hanging in my kitchen. A little reminder that Spring is on its way.
I found the original idea from the June 2011 issue of Create and Decorate magazine. I love this magazine, as it has so many wonderfully creative projects. You can subscribe or get this back issue from www.createanddecorate.com

Using the original project as inspiration, I chose my fabrics. I used colors that would coordinate with my own kitchen. You can customize your applique in this way. 100% cotton works best for applique. A shirt weight or quilting cotton is easiest to work with. Anything heavy, slippery or synthetic won't be as easy to work with and you don't want a fabric that easily frays.
Wash, dry and press all of your fabric before beginning. You wouldn't want to later wash your lovingly created work and have it bleed or shrink on you!
I chose botanical prints and a soft stripe. I actually used the reverse side of the stripe, as I wanted a soft and muted background. I used the larger botanical motifs as actual elements in my design. (Flowers and some leaves)
Materials
Homespun cotton, approximately 14" x 20" piece (background)
Muslin or coordinating fabric, approximately 14" x 20" piece for backing
Various cotton scraps in blue, greens, creams, brown, and pinks
*Therm O Web Heat 'n Bond Lite Iron-on Adhesive (optional)
Thin Cotton Batting for backing and design elements
Embroidery floss to coordinate ( I used a soft moss green or Khaki)
Lock and Key charms or similar
11 x 17 " pad of vellum for making pattern
**4 1" buttons and 1x16" thin nails to fit through button holes, or 20" thin dowel and cord for hanging
Sewing supplies, pencil, ruler

I began by drawing my design on a large sheet of vellum. This vellum was also used as the dimensions of my wall hanging, 11x17". (Minus the 'frame') That is an easy way to size your project. The vellum came in a large notepad. I found it in the art section of my local craft store.
Simple designs and shapes work best. Think 'children's coloring book'. In fact, coloring books are excellent sources of design ideas.

You can see that I have used the pad of vellum to cut out my background fabric. I simply used a pencil and traced around.

For the pattern pieces, leave the original design intact and use another sheet of vellum to trace over the pattern elements you need to cut out. Vellum is sturdy enough to use for the pattern pieces.
I save all of my design elements to re-use in a large envelope with a picture of the finished project on the front and directions written down on a sheet of paper. That way if it comes out nicely, I can re-make it as a gift for someone.
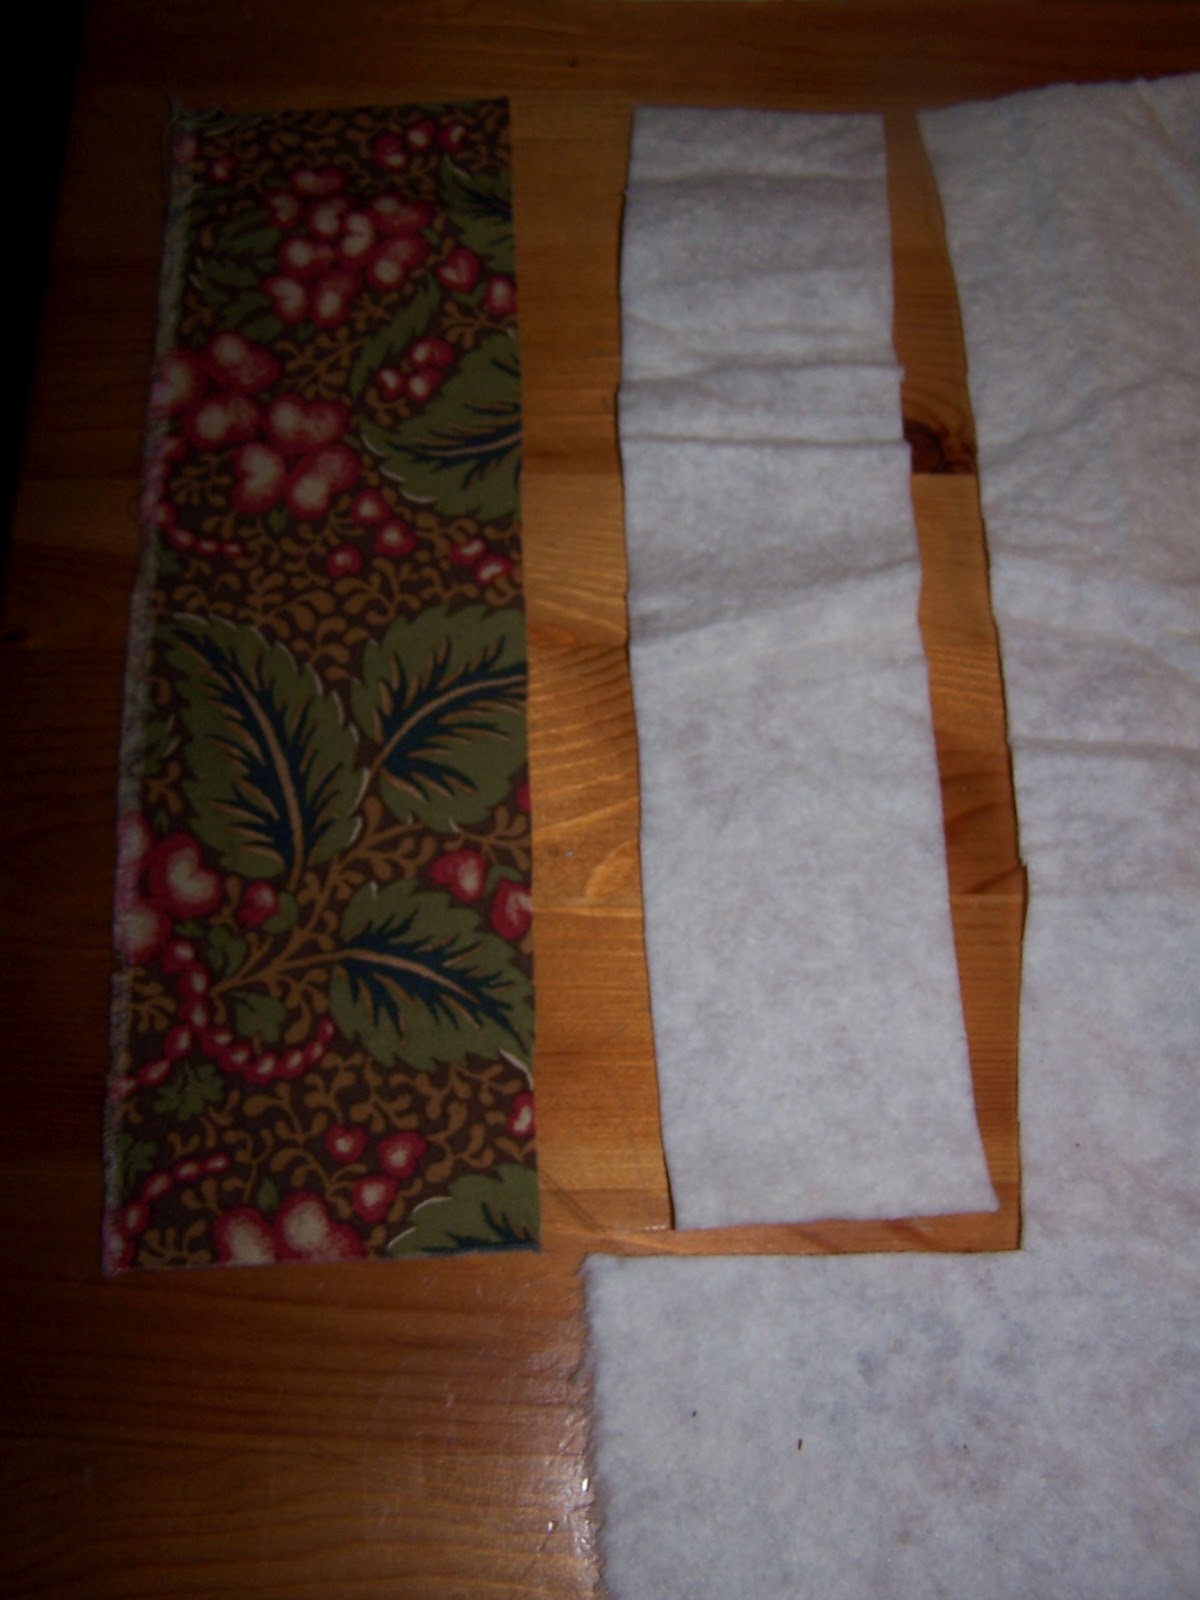

To begin the first design element, cut a strip 2-1/2" wide by the length of your background fabric. To simulate a 'tree' I used a botanical fabric with large leaves and berries with a brown background. Using this strip as a pattern, cut out a piece of thin cotton batting the same size. Trim 1/4 inch off each side, and place under fabric and press edges under.

Hand sew to background fabric, approximately 2-1/2" from the left edge, using two strands of embroidery floss in a coordinating hue. ( All floss separates into 'strands'. Cut off the length you need and then separate the strands according to how much thickness you desire to work with.) I have used a soft muted moss green. You can use whatever color strikes your fancy. I used a simple overcast stitch to apply all of the applique pieces. Wherever you buy your embroidery floss (craft store, needlework shop, fabric store), they usually have small booklets of basic embroidery stitches to learn from.
*At this point I am going to tell you that if you don't want to use the traditional technique of pressing all the edges under for each design element, you can use a product called 'Therm O Web Heat n' Bond Lite Iron-on Adhesive, or a similar iron-on bonding product. You just iron it onto the back of your fabric before cutting out your design pieces, then after placing on background fabric, remove paper covering and iron again to fuse in place. Then you can hand stitch around the edges. This eliminates the fuss of having to fold over and iron each little piece.
But I used the traditional applique technique and folded over the fabric edges. To do this, you need to cut out each little piece with an extra bit of fabric to fold over, then clip into the seam allowance around any curves to prevent puckering. I use a spray bottle with water to dampen the cloth when I iron. This helps hold the shape. You can also use your needle tip once you start sewing the piece in place to coax the edges under and into shape as you sew. You will quickly get a feel for this as you go.


A very easy way to get curved pieces to fold over nicely is to hand baste around the edges where you press under. Clip into the fabric not quite to the stitching line at regular intervals of about 1/4 " especially where curves meet, after basting. This prevents puckering. When you press the fabric edges under, they will nicely hold their shape. I don't know why this works, but it does! An extra step, but worth the effort. Just use a seam ripper to carefully remove any basting stitches that show once you sew it in place.
Remember, you are creating a possible heirloom, so take your time and do it right.

This is my 'work station'. It is a softly padded lap 'desk' with an attached LED lamp (powered by batteries) and a cup holder which I use for threads and supplies and a pencil holder. I don't need an embroidery hoop for the applique, as I find just holding the project flat on a table or this little lap desk works just fine. This way I can work in the evenings while enjoying the company of Hubby and 'watching' my favorite TV shows. (I did use a small embroidery hoop for creating the bird's french knot eyes and satin stitch legs)
If you use a table, remember to place a piece of cardboard or some other hard surface barrier between your work and the table, as your needles and pins will mar its surface.

Layer your design from the background up, starting with the branches, the bird's bodies, leaves and finally the flowers and wings. I used opposite sides of the same fabric for the leaves, and also used two leaf motifs cut out from the 'tree' fabric. The bird's wings were padded with batting the same as the 'tree'.
Stitch everything in place using two strands of floss and an overcast stitch.
I added the leaf veins and stems, flower details, bird legs, wing details, and bird's eyes using simple embroidery stitches of satin stitch, back stitch and french knot. I used a black embroidery thread for the bird's french knot eyes.
I then added a dark striped fabric 'frame' by first cutting 2 " strips of fabric to measure the same length of the finished applique. I sewed the side strips on the applique first, using a sewing machine, with a 1/4" seam allowance (right sides together), pressing flat. Then I measured, cut out and sewed the top and bottom strips the same way. I hand stitched around the inside edge of my 'frame' using the same overcast stitch as the rest of the design.

Next, I cut out a slightly larger piece of thin cotton batting and pinned this under the applique. I gave it a nice hot pressing to flatten everything out, then I hand basted the edges neatly, slightly deeper than the 1/4 " seam allowance. This will serve as a guide once I sew the backing fabric on, so make sure this basting is straight and even. This holds the batting in place while you do your final work which is quilting the layers together.
At this point you can now trim the excess batting all along the edges.

For the quilting, I simply used the same two strands of embroidery thread, and used a simple running stitch 1/16 from the edges of all the leaves, making sure to go through both layers of fabric and batting. This will hold all the layers nicely together and give your wall hanging stability and prevent sagging.
The last thing I sewed in place were the little charms for the birds.

I used 4 strands of floss for this. I wanted it to be extra sturdy to hold the charms in place. I found the charms in the bead section of my local craft store. There are many styles to choose from.
I sewed a 'necklace' around the neck of the bird with the heart locket using a 'stem' stitch and 4 strands of floss.
Once you are done with all of your embroidery and quilting, it's time to sew the backing on. I used the same fabric as the 'frame' and simply used the finished project as my pattern to cut it out. Alternately, you can just use a plain piece of muslin for the backing. Keeping the fabric and the applique face to face, (inside out) pin all around the edges except for a 6" gap on one side. This will be your opening for turning everything right side out.
(Decide if you are going to use buttons, a frame, or a dowel for framing before completing this step - **see below)
Start sewing around the edges right along the inside of the basting stitches, starting from the edge of your 6"opening gap. Continue sewing all around until you get to the other side of the gap.
Turn the work 'right side out' through the gap. Press the applique flat, making sure the corners are neat. Press the seam allowance inside the gap. Pin the gap in place. Hand stitch closed.

Or, you can frame your work in an actual frame by leaving off the fabric 'frame' and simply finishing it off with the backing and inserting it into a wooden frame without the glass.

To use buttons, choose 1" or larger buttons with holes large enough for thin nails to go through. I used 1x 16 " 'wire' nails with flat heads to keep the buttons from sliding off the nail after hanging. These are very thin nails slightly larger than the width of tacks.
I sewed the buttons on by using the bottom most hole and looping the thread around the bottom of the button and tacking in place 2 or 3 times with the uppermost hole extending above the applique edge for the nail.

I carefully spaced them evenly across the top by measuring the outermost buttons 2" in from the edge and the center ones 2 " from the center.
So there you have it, my tips and tricks for creating your very own applique wall hanging. There is no limit to how you can use your imagination with applique. Not only can you make wall hangings, table runners, place mats, and pillows, but you can use this craft for decorating clothing, purses, and even cloth shoes. Combined with embroidery, and your own selection of fabrics, you can create your very own customized works of art.
I hope this inspires you to try this easy and creative craft.

Wow that turned out amazing. I adore the added touches you made to it such as the key around the neck. When Ella was a baby she stayed with a retired couple that lived on my parents street, during the day while we worked. They loved and cuddled her, took her for walks and gave her the greatest tender care. Myra, the wife was a huge baker and made quilts in her evening hours. They were gorgeous! For Ella's 1st birthday she made her a wonderful quilt very similar to your wall hanging! I admire your patience and creativity Karen, looks great!
ReplyDeleteHi Sarah, Thank you for sharing that sweet story. Ella was a lucky little baby and how wonderful to have a cherished quilt to remember those lovely people by. xx
ReplyDeleteI am the least crafty person you will ever meet! I love seeing all your beautiful projects and your descriptions! Maybe I will have to put craftiness on my "bucket list"! The way you describe your projects through your words and pictures makes me think it might be possible :)
ReplyDeleteHi Cherie, Sometimes when someone says they are not 'crafty', you find out they are creative in many ways, which I am sure is true of you, judging by your beautiful home and gardens! xx
ReplyDeleteWow that is just so beautiful! You have a great eye for color and design, and such patience not only to make it in the first place, but to give us this brilliant tutorial. I haven't done much decorative stitching lately, but there is something so satisfying about it. (Still mostly knitting going on at my house!)
ReplyDeleteYou've created a lovely heirloom. I bet you'll enjoy that every single day!
Thank you, Christine! You are always so encouraging. xx
ReplyDelete